
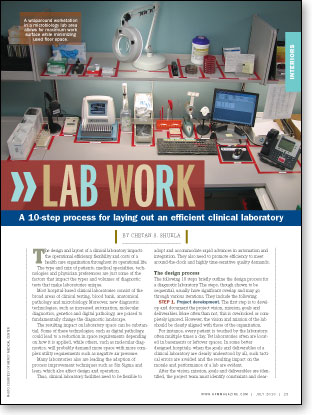
 The design and layout of a clinical laboratory impacts the operational efficiency, flexibility and costs of a health care organization throughout its operational life. The type and mix of patients, medical specialties, technologies and physician preferences are just some of the factors that impact the types and volumes of diagnostic tests that make laboratories unique.
Most hospital-based clinical laboratories consist of the broad areas of clinical testing, blood bank, anatomical pathology and microbiology. Moreover, new diagnostic technologies, such as increased automation, molecular diagnostics, genetics and digital pathology, are poised to fundamentally change the diagnostic landscape.
The resulting impact on laboratory space can be substantial. Some of these technologies, such as digital pathology, could lead to a reduction in space requirements depending on how it is applied, while others, such as molecular diagnostics, will probably demand more space with more complex utility requirements such as negative air pressure.
Many laboratories also are leading the adoption of process improvement techniques such as Six Sigma and lean, which also affect design and operation.
Thus, clinical laboratory facilities need to be flexible to adopt and accommodate rapid advances in automation and integration. They also need to promote efficiency to meet around-the-clock and highly time-sensitive quality demands.
The design process
The following 10 steps briefly outline the design process for a diagnostic laboratory. The steps, though shown to be sequential, usually have significant overlap and may go through various iterations. They include the following:
Step 1. Project development. The first step is to develop and document the project vision, mission, goals and deliverables. More often than not, this is overlooked or completely ignored. However, the vision and mission of the lab should be clearly aligned with those of the organization.
For instance, every patient is touched by the laboratory, often multiple times a day. Yet laboratories often are located in basements or leftover spaces. In some better designed hospitals, when the goals and deliverables of a clinical laboratory are clearly understood by all, such tactical errors are avoided and the resulting impact on the morale and performance of a lab are evident.
After the vision, mission, goals and deliverables are identified, the project team must identify constraints and clearly illustrate success and failure criteria.
For example, if one performance criterion for a lab is the ability to provide a 45-minute turnaround time for emergency department patient samples from the time a test order is entered until the result is available, samples should reach the test station within a time that allows that expectation to be fulfilled. If it takes 25 minutes just to get a sample to the lab, the expectation is not going to be met.
In the absence of clear deliverables, and space and processes designed to meet those deliverables, success or failure will be defined by perceptions and create an environment of finger-pointing.
Step 2. Team development. A strong project manager with the required authority, responsibility, resources, knowledge, people skills and integrity must lead the project.
This function requires full dedication and cannot be an additional task. How can a facilities director tasked with managing the operation of a medical campus do sufficient justice to a design project and give adequate time to the team? In such cases, it may be better to assign a full-time project manager, overseen by the facilities director.
Along with the project manager, a cross-functional team of the best and brightest with representation from all impacted specialties is essential to ensure that details are not overlooked.
Clinical laboratory science continues to evolve at a rapid rate with complex technical and regulatory implications. In addition to in-house team members, external consultants may include process consultants, architects, engineers, construction managers, and environmental and safety consultants.
Step 3. Due diligence. The phrase "not enough time to do it right, but enough time to do it again and again" illustrates the importance of this step.
Applying due diligence to understanding current and projected laboratory requirements is critical to achieving long-term flexibility and minimizing costly expansions or modifications.
A clinical laboratory department in any hospital is really a collection of various laboratories, differentiated by the diagnostic testing methodologies employed. The most commonly found laboratory departments include the core clinical laboratory where body fluids are tested on automated machines, the pathology laboratory where tissue samples are mounted on slides for microscopic examination and the microbiology laboratory where patient samples are tested for the presence of bacteria and viruses.
Each one of these is usually further bifurcated into subdepartments. For instance, the core clinical laboratory may be differentiated into an automated area and a less automated space where more labor-intensive tests are carried out to supplement the automated tests. The needs of these various departments can often clash with each other. The due diligence should identify these requirements at the outset.
Quite often, due diligence is entrusted to members of the laboratory management staff who, while being the most knowledgeable, also happen to have the least amount of time at their disposal to collate and analyze the vast amounts of information. Consequently, a team approach is recommended.
Step 4. Analysis and program development. This is the time to analyze the laboratory data collected in the previous step into information that can drive future design.
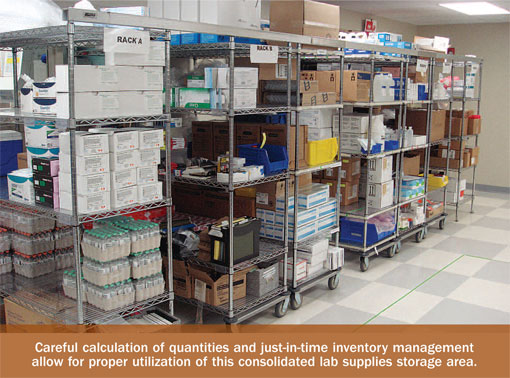
This may be in the form of current and future process maps; projected test volume and mix; capacity analysis; equipment and utility lists; staffing models; work schedules; inventory quantity; cost and revenue projections; and regulatory, physical, environmental, safety and ergonomic requirements.
The prudent approach is to assign dedicated resources to work closely with the laboratory people and translate this complex information into a program document with which space designers and architects are familiar.
Step 5. Process and schematic design. If process optimization is a goal, development of the optimized future processes should be concurrent with selecting location and adjacencies and undertaking schematic space design.
A process optimization consultant can work with the team to identify opportunities for improvement, challenge the status quo, think outside the box and collaborate with the design-build team to come up with ways to work around constraints.
The schematic design, based on an optimized process, is often difficult to visualize, especially when people involved are adept at working in a sub-optimal environment. Simulations, dry runs and experiments provide proof of concept and minimize the learning curve during implementation. Preliminary cost estimates can be developed at this point to provide a financial metric to gauge the progress of the project.
Step 6. Communication. Communication with all impacted stakeholders is essential to getting their support for the optimized process and design.
The degree of change and the complexity of the processes determine the frequency and methods of communication. For long-term acceptance of the new design and processes, all the stakeholders need to feel their voices were heard and ideas were considered. An effective communication program cannot guarantee acceptance, but the absence of one can assure dissatisfaction.
Getting feedback from all stakeholders provides an opportunity to vet the design through multiple people. This is always contentious. However, if contention is managed well, it helps identify critical flaws in the design. If managed poorly, it leads to unintended compromises and the "least common denominator." The goal is to seek out win-win solutions.
Step 7. Process experimentation and detailed design development. An idea that looks phenomenal on paper may totally bomb in the real laboratory.
While it may be impossible to test everything, processes that can be tested ought to be tested. The opportunity to tweak the processes and design before construction grows a team's confidence while curtailing overconfidence.
Selection of equipment, furniture, storage and handling systems occur at this stage along with colors, finishes and materials.
Emphasis on flexibility requires that modular furniture that can be more easily moved with minimal cost and disruption should be selected. With few exceptions, most current laboratory processes can be conducted on moveable surfaces.
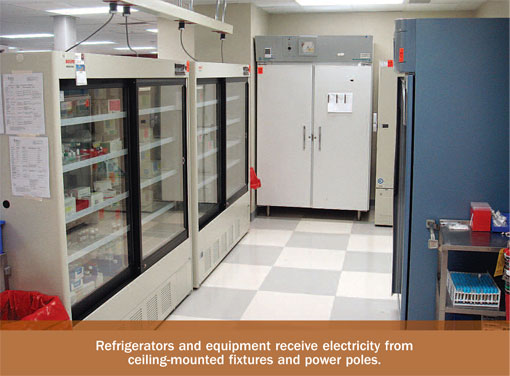
A bank of refrigerators provides greater flexibility, scalability and maintainability than walk-in refrigerators. Walk-in fridges and freezers, on the other hand, can sometimes be more efficient in terms of capacity. A detailed comparative analysis, using data collected during due diligence can help make an objective decision.
Similarly, during equipment selection, the utility requirements of certain equipment should be objectively compared. Is it really cost effective in the long run to buy a cheaper machine that requires a water purification system that, in turn, occupies space and renders the machines immovable because of water supply and drainage lines?
The design team should provide objective cost-benefit analyses to the leadership committee to assist them with these decisions. The detailed design phase yields drawings needed for cost estimation and construction bidding.
Step 8. Bidding and cost estimation. Getting cost estimates from contractors always leads to further design changes.
Thus, a team member with construction cost estimating experience can easily cut days, if not weeks, from the project timeline. It minimizes surprises and unwanted cost and time escalation. The expert, being involved in the earlier phases of the project, also will have a better understanding of the motivations behind certain design aspects and, therefore, will be able to suggest efficient alternatives.
When organizations have policies that include a bidding process, seeking the services of a construction expert to assist in the design process can achieve the desired effect without compromising the policy stipulations.
Step 9. Permitting and regulatory approval. In the wake of the economic downturn, government and industry regulatory agencies have generally been taking longer to approve drawings. Laboratories, with their complex chemical, safety and environmental requirements, may end up getting a higher degree of scrutiny.
A best practice to counter this challenge is to pay attention to details. If a flammable liquid is to be stored in a histopathology laboratory area, identifying the maximum quantity and details about the liquids and providing adequate storage, ventilation and disposal will help avoid costly engineering changes at a later stage.
Asking the right questions and documenting the responses can help solidify the case for each design decision.
Step 10. Design modifications and construction. Keeping engineering changes to a minimum at this stage of the project requires diligence and attention to detail during steps five through seven.
Not only are changes at this stage expensive and time-consuming, but they could end up jeopardizing the new processes. A compromised design could potentially eliminate the benefits of process improvement efforts.
The entire design team should stay involved and seek ways to address this risk. Time is always of the essence at this stage, so it is essential to make sure all team members are available and engaged.
Crucial and complex
Location, design, flexibility and operational efficiency of a laboratory can mean the difference between life and death.
The design of this crucial and complex element must occur through a collaborative team approach.
Chetan S. Shukla is senior consultant for ValuMetrix® services at Ortho-Clinical Diagnostics Inc., a Johnson & Johnson Company. He can be reached at cshukla@its.jnj.com. ValuMetrix is a registered trademark of Ortho-Clinical Diagnostics Inc.
| Sidebar - Reconfigured lab space allows for added elements |
| Mercy Medical Center, Cedar Rapids, Iowa, is a 350-bed hospital serving the Eastern Iowa communities since 1900. Located across the hall from the emergency department, its laboratory had been built in the 1970s and was in need of an upgrade to allow for greater flexibility and efficiency—and to improve the environment of the caregivers and patients. The leadership of the organization recognized the challenges of the old laboratory design and the opportunity to incorporate excellence and continuous improvement. They partnered with consultants from ValuMetrix® Services at Ortho-Clinical Diagnostics Inc., a Johnson & Johnson company, to apply their principles to the laboratory design and operation. An assessment of the laboratory clearly highlighted the challenges of the existing design, which was more than 30 years old at the time. Departments had grown and changed organically. Testing equipment and technologies had been placed in available space rather than ideal location. The casework, attached to the floors, impeded flow and flexibility. Entire departments were segregated across different rooms. This, in turn, adversely impacted productivity and morale. Coordinated by the consultants, the design team represented all laboratory functions. It worked with the facilities department, management and leadership using a 10-step program to design and implement the 10,000-square-foot laboratory in the existing space. The final design relocated the outpatient blood draw area to a more convenient location adjacent to the registration area and reconfigured the rest of the laboratory departments and administrative spaces within the existing space. Material storage was segregated into room-temperature and refrigerated storage areas. The lab chose a series of refrigerators and freezers instead of a walk-in fridge because it allowed for greater long-term space flexibility and growth. Room-temperature materials were organized into compact yet economical rolling wire-shelving. Modular furniture, power poles, ceiling- and wall-mounted fixtures, and intelligent use of space allowed the lab to accommodate a conference room, employee locker room, expanded break room and administrative office area with an attached training room into the design. |